

Jetnuts JN
Hex Key Actuation
To Put on Jetnut
- Spin "Jetnut" on by hand until snug.
- Turn actuating screw with hex key until tight, approximately 100-150 inch lbs. torque.
To Remove Jetnut
- Using hex key, loosen actuate screw until it is flush with nut body. "DO NOT REMOVE SCREW".
- Tighten Jetnut by hand to reset pressure pad system.
- Jetnut can now be removed by hand.
To Refill Jetnut
- Leave Jetnut snug against part.
- Back out actuate screw until flush.
- Remove 1/4" cone point screw.
- Insert 1/4-28 straight refill fitting.
- With grease gun, fill nut until piston is firm against actuate screw.
- Remove refill fitting and replace 1/4" cone point screw.
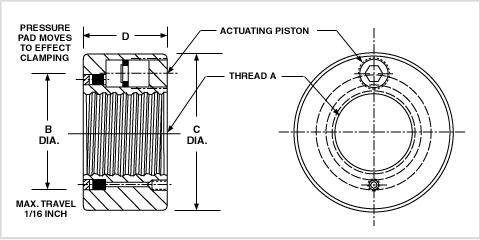
| Part # | Thread A | Pressure Pad Diameter B | Outside Diameter C | Length D | Thrust Pressure per 100 to 150 inch lbs. torque |
| JN050 | Up to 1/2" | 1" | 1 3/4" | 1 7/16" | 3432 |
| JN075 | Up to 3/4" | 1 1/2" | 2" | 1 9/16" | 5399 |
| JN100* | Up to 1" | 1 3/4" | 2 1/2" | 1 3/4" | 11,780 |
| JN125* | Up to 1 1/4" | 2" | 2 3/4" | 1 3/4" | 13,750 |
| JN150 | Up to 1 1/2" | 2 1/4" | 3 1/8" | 1 3/4" | 15,710 |
| JN200 | Up to 1 7/8" | 2 3/4" | 3 3/4" | 2" | 19,640 |
| JN4500 | Up to 2 1/2" | 3 3/4" | 4 1/2" | 2" | 27,740 |
| JN5000 | Up to 3" | 4 1/4" | 5" | 2" | 31,500 |
| JN5500 | Up to 3 1/2" | 4 3/4" | 5 1/2" | 2" | 35,300 |
*These models available with piston 90% to centerline as JNT models
Hydraulic pressure is distributed equally over entire area of the pressure pad (diameter B). This action compensates for out of squareness of the work pieces or faces where the Jetnut is used.
Note: Operating temperature is -15° to +260° for continous use.
Important: When ordering, check pressure pad diameter in relation to mating part.